 Save 10% off your first LabelValue order |
 How to Create & Print PayPal Shipping Labels: 3 ways to print labels from PayPal w/troubleshooting guides
- Nov 27, 2017
Do you feel like your ALWAYS printing shipping labels? Is it cutting into your time you should be spending on other important tasks like growing your business? Streamline your paypal shipping process with these helpful tips! There are 3 main options for printing UPS or USPS shipping labels from Paypal. Whether you sell on eBay or include Paypal as a payment option for your store, these steps for creating and printing shipping labels from Paypal's interface will help you print Paypal shipping labels efficiently.
Options for Printing Shipping Labels with PayPal:
- 1. Small Volume Method Print on plain paper with inkjet/laser printer and tape to boxes.
- 2. Intermediate Volume Method Print on Adhesive Shipping Labels with inkjet/laser printer
- 3. Large-Volume & Fastest Method Print 4" x 6" labels with a Dymo LabelWriter or Zebra thermal label printer
First, we will show you how to create and print shipping labels from PayPal on plain paper for both Windows and Mac OS X. This method outlines the basics for printing from Paypal that the other two methods use as well. Then we will go into detail showing you the tips and tricks specific to each of the other printing options.
First things first, make sure that your printer is connected to your computer and check that you have paper loaded. Next, pull up your Paypal Account page and login. Go to your Profile & Settings page. 
Profile and Settings > Selling Tools Select the My Selling Tools tab. Here you can select your ship from address, the shipping carrier you would like to use and more.
Note: to ship using UPS, you will need to link your UPS account first.
After you've shipped enough of your products, you'll learn which shipping method is going to be the most cost-efficient for your business. We need to make sure that we have the right printer and paper selection for printing our labels, so click on the Update link next to the Shipping Preferences line.

Select Default Printer Type In the Shipping Carrier section you will see the default type of printer listed. Select the Change Printer Type link on this line.

Verify Your Print SettingsHere you will be able to select from the few different printer options that are supported with Paypal's shipping label printing. By default, it should already be set to Laser/Inkjet Printer, which is what we want.
Below the drop-down you will see a checkbox for Print Receipt. This will print your label's receipt information after the label is printed, on the same sheet. Read the tip below to find out why you might want to turn this feature off. Once the laser/inkjet printer is selected, press save to lock it in as the default printer.
Tip: How to print 2 labels on the same sheet and print the shipping label only (turn off the receipt print default option)
Tired of printing only one label per page when there's obviously room to print 2 shipping labels per sheet at the size Paypal requires? Or do you only need to print the shipping label and not the receipt?
No worries, that can be easily fixed. Unfortunately, you can't actually make it print 2 labels at one time, but you can print on half of the paper and then flip it over after it's done to print the other half. I like to let half of my shipping labels print in a large batch, then I'll stack them and flip them and put them back to print on the other half. It adds time, but saves a lot of wasted paper.
To do this and enable your Paypal account to print 2 labels on the same sheet of paper, you simply need to turn off the default setting that prints a receipt of information with each label. Just go back to your Profile and Settings > Selling Tools > Shipping Carriers > Update to edit this option. When you’ve unchecked this option you will only print the shipping label with no receipt.
Now we're ready to print some shipping labels! Go to Tools > All Tools.
On this screen, you can favorite your most used tools. By default the Multi-Order Shipping is not favorited and is about halfway down the tools page. We recommend favoriting it so it will be at the top in the future. Once you find the tool, open it.In PayPal's latest update, when you get to this step it will again confirm the shipping preferences you just set.
Make sure it all looks correct still - set to Laser/Inkjet Printer and select Save. Here you will either create new shipments or process the shipments that have been added automatically, imported from your orders in PayPal and/or eBay. To create a shipping label, simply select the Create Shipment button. Then fill in the fields for the shipping information needed to print the postage.

Note: PayPal's newest multi-order shipping tool automatically imports all orders except orders that require a customs form to ship. It does not, however, allow for upload of CSV files. They indicate on their site that this will be updated soon. If your workflow requires this, you can select the "switch to the classic shipping label experience" link above the main screen.
Once you have all of the orders ready, you need to review and pay for your postage. Here you can calculate the different shipping options based on the actual details of the items you are shipping. After you have created any new orders that you need to ship and paid for your postage, you are ready to actually print your shipping labels from PayPal's multi-order shipping page.
To print, select your orders and press the Print (X) Shipping Labels button. 
This will bring up the USPS print screen, where you can print a sample label to make sure everything is set up correctly. After you've verified everything is correct, press the Print Label button.
This will open up the familiar Windows print dialog box. Here you just need to re-check that all of your settings are correct. Make sure that the printer you want is selected and that the default size and orientation is correct (for 8.5x11 paper use portrait orientation).

Once you've double-checked everything, go ahead and hit print. Your pre-paid shipping labels will print out. Now you can cut them out and attach them to the boxes with tape and send them out to your expectant customers!
Tip: How You Can Print One-Off Labels Fast
If you have the need to just print one label quickly, you don't need to go through all of these steps. You can simply go to www.paypal.com/shiplabel/create and create your one-time shipping label from Paypal's single label interface.
Mac OS Instructions
To print labels from PayPal using your laser/inkjet printer and a Mac computer, the steps are pretty similar, but there are some bugs that you may encounter depending on the version of Mac OS X that you're running. Basically, go through the steps outlined above as if you were printing on a Windows system. When you go to print your labels, however, you may find that nothing happens when you select the "Print Label" button.
If this happens to you, you will need to save the file to your computer, locate the file and then make sure the file name ends with .pdf. If it does not end with .pdf, edit the file name by replacing the extension with .pdf. After doing this, you should then be able to open the file and print it from your laser printer.
This is obviously a very time-consuming and frustrating workaround, so we would suggest purchasing a label printer to maximize your print efficiency if you're printing many labels from PayPal. More on this to come.
2. Printing Labels from PayPal using half-sheet labels with adhesive on Windows & Mac
Are you getting tired of cutting and taping paper to boxes? It's time to graduate from small-time online seller to the mid-level solution: adhesive labels sheets for your inkjet or laser printer.
Essentially, you'll use the exact same process as you would for printing on normal 8.5 x 11" paper. The difference will be making sure your laser/inkjet printer is set up correctly to handle the added thickness of adhesive label paper. Also, make sure you refer to the Bonus Tip above for printing on half sheets of paper by turning off the receipt option in PayPal. Otherwise you will be using one label on each order for receipt printing, which would be a waste of money. 
From thatprinterguy.com: To make sure your laser/inkjet printer can handle the added thickness of the label paper, you will need to check your specific printer's user guides to find out how to access the bypass/multi-purpose feed tray. Most printers have some form of a multimedia bypass tray which allows the user to bypass the typical up/down, in/out motion of paper traveling through the typical printer feed. This is really important to avoid paper jams and incorrectly placed print.
You will also need to configure your print settings to make sure your printer is optimized for printing on the thicker and potentially more difficult material. Here's an example of what this process looks like, using my Dell 2335 printer.

First, you will want to navigate to your Printers & Scanners settings by searching for "Printers" in the Windows search box.
Once you have found your printer, select it and press Manage. Then select the Printing preferences link. This will open a dialog box with your editable printer preferences.

Next, on this screen you will need to select the Paper/Quality tab.
There you can adjust the Paper Source and Media options accordingly. My printer has an MPF(multi-purpose feed) tray as well as a Labels media setting, so I simply chose these options.

Finally, after you have your printer configured correctly, just follow the steps in option 1. Printing on sheets of paper from laser/inkjet printer.
The above outlines how to verify your PayPal account setup and print perfect shipping labels.
Note: You will need to refer to your specific printer guide to see how to use your printer's MPF tray.
If you are printing on plastic/synthetic material or some other non-standard material and you find that the ink is not laying down very well, you can adjust the DPI of your print for better results. To do this go to your Paper/Quality tab and then select Advanced. Among these settings you will find a print quality option. Try experimenting with the different DPI options to see what works best for your printer.
For a Mac, you will use the steps above, however your printer settings will be managed from the Printers area of your System Preferences. Please refer to the plain paper instructions above for any Mac specific troubleshooting or printer setup.
3. Printing Labels from PayPal using a Dymo or Zebra 4x6 Label Printer on Windows
Here is how to get shipping labels from PayPal using a label printer. This is by far the most efficient method for printing labels and is the one we recommend if you're shipping any sort of volume through PayPal.
First, you have to make sure your label printer is set up and in good working order. For our example, we're going to be using the Dymo LabelWriter 4XL, as this printer is not included in PayPal's default options, and yet is one of the most popular options for printing shipping labels due to its ease of use.
For the Dymo 4XL you need to first install the print driver and Dymo Label Software on your computer, before you plug in your printer.
Once you have verified your printer is set up on your computer by printing a test label, you can navigate to PayPal to set it up as your default printer there.
To do this you will go to Profile & Setting > My Selling Tools > Shipping Preferences > Update. (see part 1 above for screenshots on navigation to this screen).
Once here, you will set your label printer and paper size by going to Shipping Carrier > Change Printer Type.
Note: In PayPal's latest interface a receipt will not be printed if you are using a label printer, so you don't need to worry about wasted labels from receipts.
Here you can choose any of the Zebra 4" x 6" label printer options. I prefer to use the Zebra LP2844 option, because it is the most similar in feature set to the Dymo 4XL, but any of the 4x6s should work fine.
Once you've selected your 4x6 printer from the list, Save and close the dialog box.
Now you can navigate to your Multi-Order Shipping screen from your Tools section. (Again, you can see screenshots of this navigation by going to part 1 of this post).
Here you will follow the steps in part 1 for importing your orders, paying for postage and getting to the preview/print screen.
Once you select Print Labels from the print preview screen, you may need to make some adjustments to the default options for your printer.
Print a test label first and see if it prints correctly. Depending on your system, browser, setup etc. you may be able to print right away with no issues. If you find that your label is printing strangely, however, go into the printer settings when you select the Print Labels button and make the following changes until everything looks like this screenshot.
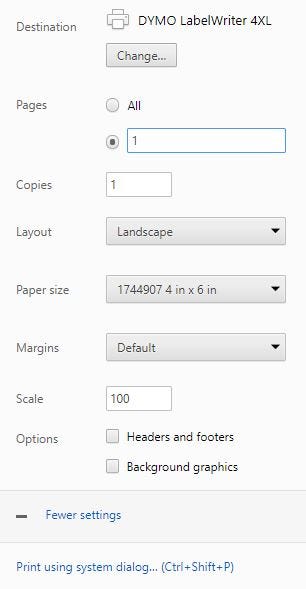
Make sure that your Dymo 4XL or other label printer is selected as the Destination.
- - Do not print ALL PAGES. Change the page range to 1.
- - Set the layout to Landscape.
- - For Dymo 4XL set the paper size to 1744907 4 in x 6 in.
- -For all other printers make sure paper size is 4 x 6.
- - You can add a new custom paper size if needed by going to Control Panel > Devices and Printers > Select Desired Printer > Print Server Properties (at the top-center of the window) > Create a New Form.
- - Margins: None.
- - Scale: Adjust as needed depending on how your labels are printing.
- - Once you have all of your settings here squared away, you should be good to print your labels perfectly from your label printer!
B. Printing PayPal Shipping Labels from Mac with a Label Printer
The only difference between printing with a Mac as opposed to on Windows is in the initial setup of your printer settings.
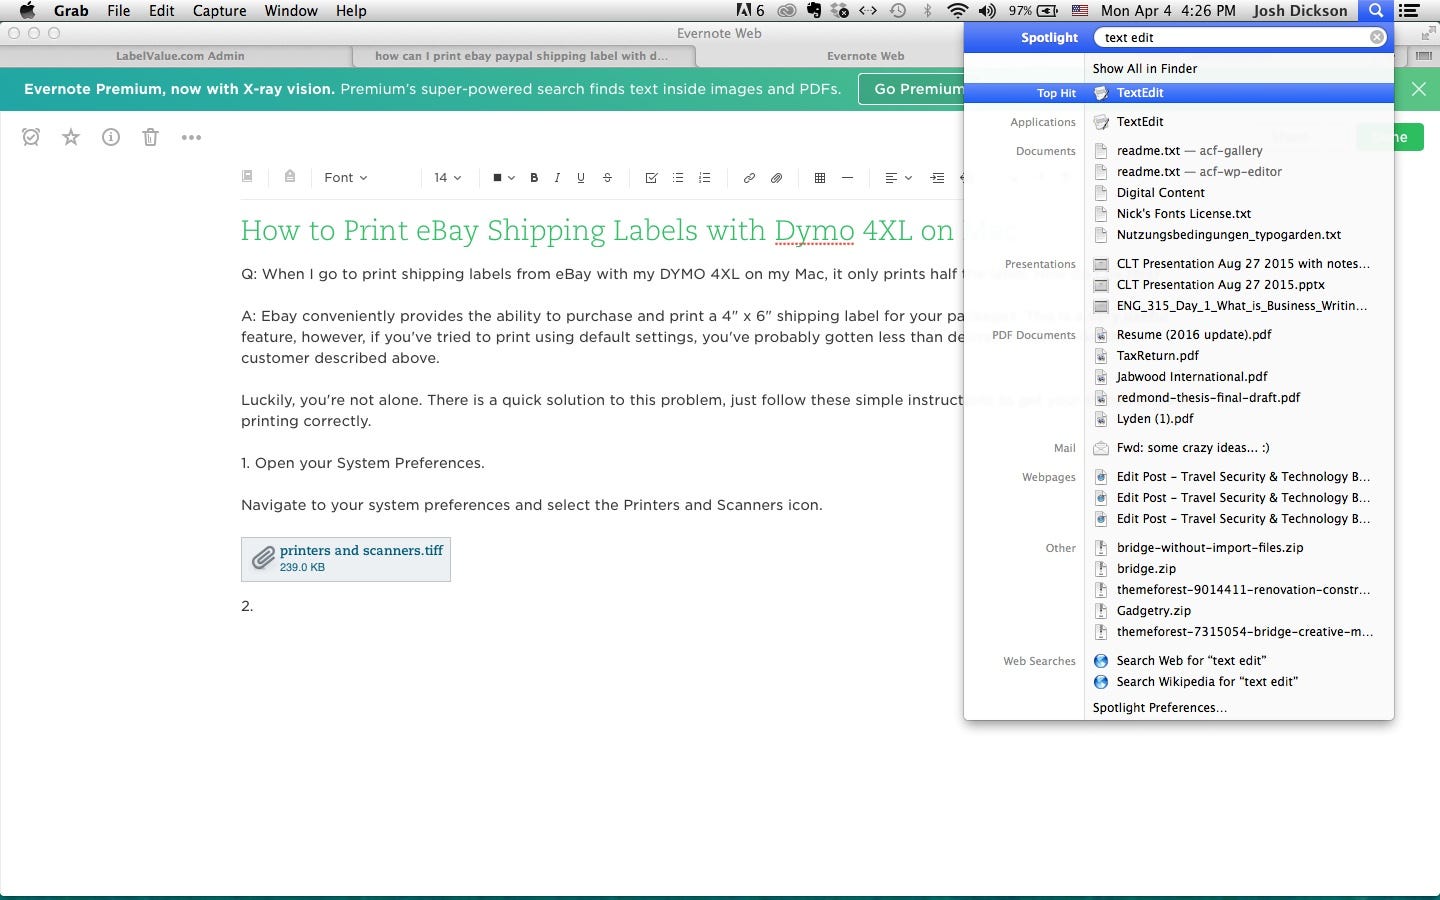
First of all, you need to navigate to your default print setup. There are many ways to do this, but I've found that the easiest is to simply go through your TextEdit application.
Open your TextEdit application by using your search icon and typing "TextEdit". Open a new document.
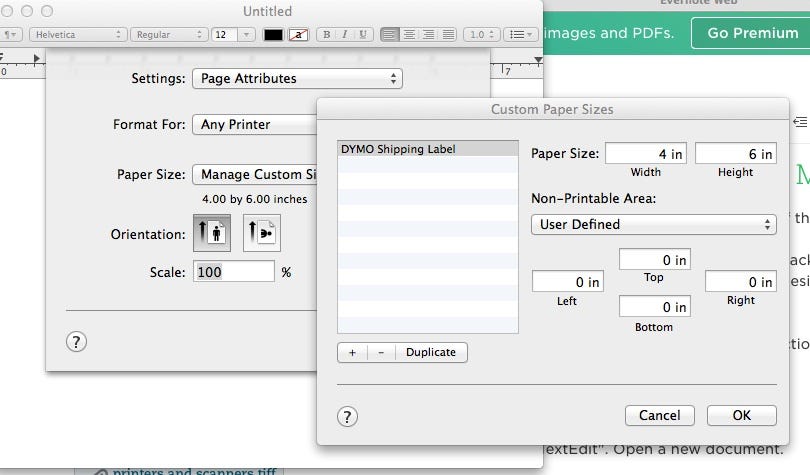
Once you have your document open, go to File > Page Setup. Select the Paper Size dropdown and choose Manage Custom Sizes.
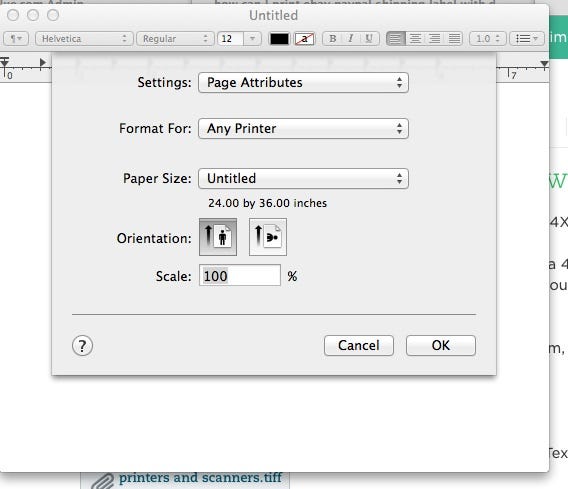
Select the default "Untitled" option and name it whatever you'd like. I'm naming it Dymo Shipping Labels.
Then set your Paper Size to 4 in x 6 in. Adjust your Non-Printable Area to 0 in. all around. Then select OK.
Now you simply need to go to your Printers and Scanners section in System Preferences.
Once here, you select your label printer and change the Default Paper Sizeto your new custom size. From here, you can follow the steps for printing from Windows on a label printer laid out above to make sure your PayPal labels are printed perfectly.
These are the different methods available for printing labels from PayPal for both Mac and Windows systems. We've covered printing on blank paper, half sheets of paper, label sheets, laser/inkjet printers, and label printers.
Have any further questions on how to make a shipping label with PayPal? Use the chat button below and we will be happy to help you in any way that we can. That said, we hope this guide helps you navigate the many potential roadblocks that many users run into when printing shipping labels from PayPal. Happy labeling!