 Save 10% off your first LabelValue order |
 How to use the Align Tool in Adobe Illustrator: Design Tips Post #4
- Apr 14, 2017

Welcome to the LabelValue Design Tips Mini-Series. For Part 4 of our Mini-Design Series we will show you how to use the Illustrator Align Tool as well as some of its options in Adobe Illustrator. The Mini-Design Series is an 8-week installment of useful design knowledge curated directly from our team of designers at LabelValue.com. We feature helpful hints and design software tips to help you in the process of designing great labels!

View all of our design mini-series:
- Tip 1: How to Trace Objects with the Pen Tool
- Tip 2: How to Equally Duplicate a Shape Around A Circle
- Tip 3: How to Link and Embed Images
- Tip 4: How to use the Align Tool in Adobe Illustrator - Currently Reading
- Tip 5: How to Set up Document Bleeds in Adobe Illustrator
- Tip 6: How to Create a Clipping Mask using Adobe Illustrator
- Tip 7: How to Type on a Circle Using the Path Tool in Adobe Illustrator
- Tip 8: How to Use the Shape Builder Tool in Adobe Illustrator
As always, if you have questions feel free to reach out to us by e-mail. We'd love to hear from you!
Design Tip #4: Illustrator's Alignment Tool
One Alignment Tool, Many Options
Illustrator gives you many options for aligning your artwork. This can be a very useful tool to have in your design tool kit. These alignment options however, aren’t immediately obvious when you are using it. In this tutorial, we will go over how to align objects in Illustrator and the two most common options for doing so.
Part A: Aligning Shapes to an Artboard in Adobe Illustrator
First, what is an artboard?
When you create a document in Illustrator, the width and height you select determines your artboard size. This, in most cases, will be the size of your final exported document, whether that be for print or digital purposes. It's always a good idea to base your design's size on the specifications of the project. This will help to avoid unnecessary edits to your overall layout further along in the design process.
Adobe Illustrator gives you the option to align shapes and objects to the artboard itself. This can be a great option if you need to center a shape, or align an object vertically or horizontally.
You can align elements of your artwork to the artboard by following these steps:

STEP 1: With your Adobe Illustrator document open, select the shape you want to align. For our shape we have made a blue circle with our logo in it.

STEP 2: Next, we will navigate to the Align sub-menu, located on the top menu of Adobe Illustrator.

STEP 3:With your align menu located, we need to make sure we have the “Align to Artboard” option selected.

STEP 4:Now we are all set up to align our circle to the artboard as needed. We will start by using the “Horizontal Align Center” option. With your shape selected, press the Horizontal Align center button, the second from the left. You should see your shape horizontally align to the center of your artboard.

STEP 5: Next, to center our shape in the middle of the artboard, we will use the “Vertical Align Center” option. With your shape selected, press the Vertical Align Center button, the fifth from the left. This will now move your object to the vertical center of the artboard. Your shape is now perfectly centered in the middle of your artboard.

STEP 6: Adobe Illustrator also has alignment options for “Horizontal Align Left.” This option aligns the left edge of your shape to the left horizontal edge of your artboard.

STEP 7: To align your shape to the right of the artboard. Select the “Horizontal Align Right.” The right side of your object will align to the right of the artboard.

STEP 8A: Illustrator gives you the option to align the top and bottom of the artboard as well. Use the “Vertical Align Top” align option to align your shape to the top of the artboard.

STEP 8B: Additionally, you can use the “Vertical Align Bottom” alignment option to align your object to the bottom of the artboard.

STEP 9: These alignment options can be combined in any combination to align your shape to exactly where you need it. Like in this example, we needed our shape aligned to the left hand top corner. By first selecting “Horizontal Align Left” and then “Vertical Align Top” our image is easily re-positioned to the exact spot we need.
Part B: Aligning a Shape to a Selection in Adobe Illustrator
What is a selection?
In an Illustrator document, you can have many elements that make up your design. Text, images, vector graphics and more all make up the elements of your final finished design. You can select specific pieces of your design to edit, arrange, delete or move within your design. These are called a "selection" because you select them with the Direct Selection Tool.
We just saw how we can use the align tool to align shapes to an artboard in Adobe Illustrator. But what if we have two objects within an Illustrator file that we need to align to each other? This is a common design occurrence when creating complex vector shapes.
Luckily, there is an easy way to align selections to other elements within your art file.

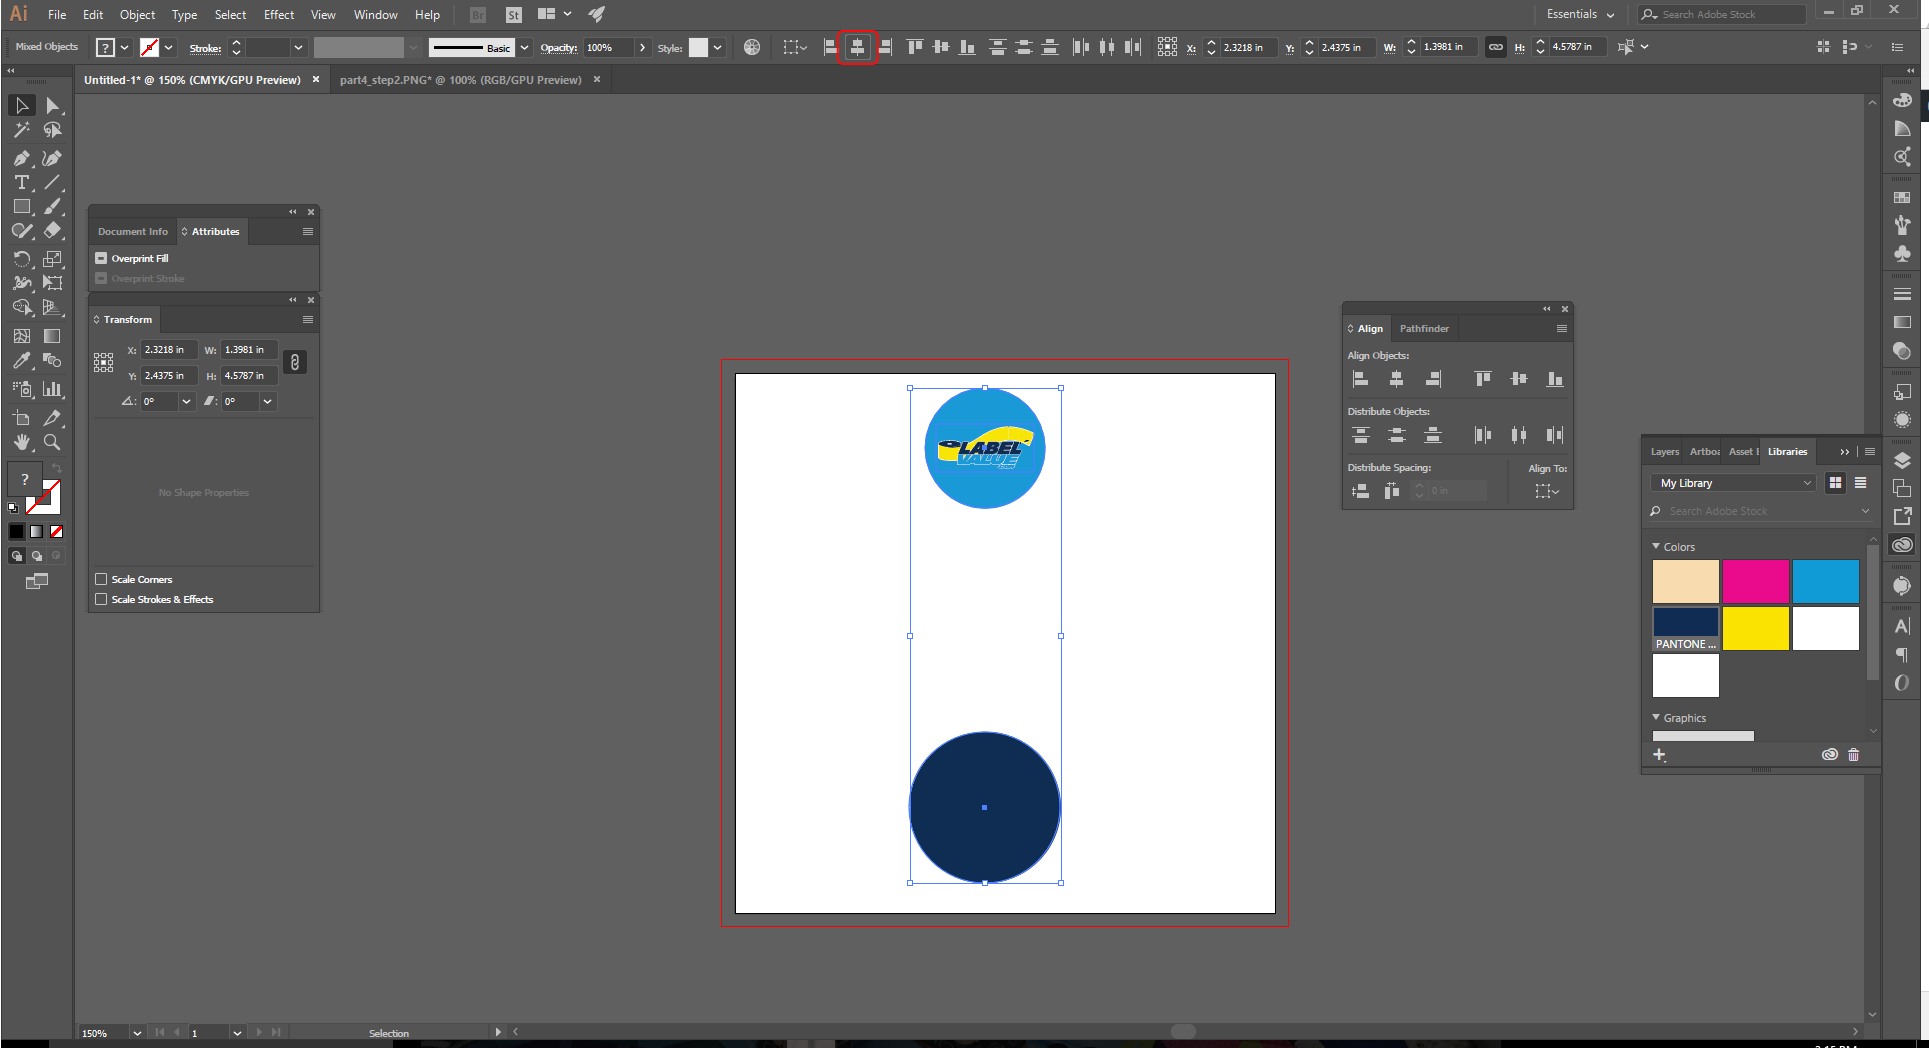
STEP 1: Start by having the two shapes that need to be aligned to one another. Open them both in the same Illustrator document. For our example, we will be building a two-part circle for our logo. The larger blue circle has been arranged to the back of the order of objects. This is important because when aligning different sized shapes, larger ones will cover smaller shapes if not arranged correctly. To do this, select the shape needing to be rearranged, right-click, and navigate to Arrange. In the Arrange sub-menu, select send to back.

STEP 2: We need to make sure “Align to Selection” is selected in our Align Menu. To do this select one of your objects, and navigate to the top menu of Adobe Illustrator. Select, “Align to Selection” in the drop down menu.

STEP 3: Now that our align menu is set up to "Align to Selection" we can begin to align our objects. Select both object by clicking on the first one, then while holding the SHIFT key,left-click to select your other shape you will be aligning. Upon selecting both shapes, your align menu will reappear in the top menu of Illustrator.
STEP 4: With both objects still selected, click the “Horizontal Align Center” option. As you can see it aligned both of our objects to the horizontal center of one another.

STEP 5: Next, we will align the vertical centers of our two shapes. With your two shapes still selected, use the “Vertical Align Center” align option. We have easily aligned both the vertical and horizontal centers of our two shapes.

STEP 6:Just like aligning to the artboard, Illustrator also gives you options to align your two objects in many other ways as well. For instance, we will align the tops of our two shapes to each other by using the “Vertical Align Top” feature in the align tool bar.
NOTE: All of the other Align Options we previously went over in part 1 of this tutorial are also available for “Align to Selection” as well. The align tool is one of the more commonly used features in Adobe Illustrator.
Have a question related to the Align Tool or the Adobe Creative Suite? Send us an email with your question to service@labelvalue.com with "Graphic Design Question" in the subject.
Turn your designs into labels or stickers online with InstaProof
Order Yours Today!